Friday, December 31, 2010

Slider Bar

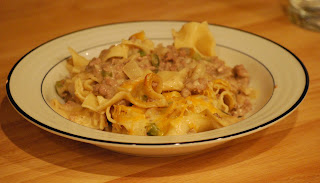
For Denis's birthday this year I invited both of our immediate families to dinner to celebrate. Instead of doing a formal sit down dinner we did a casual slider bar. It was kind of like having a summer barbeque in the middle of the winter. On the menu were both cheeseburger sliders and pulled pork sliders. Since it was Denis's birthday he chose the menu so I also made lobster mac and cheese. Super tasty! I put a variety of toppings out to go with the burgers and also served a salad on the side. I used two different types of cheeses and used whole wheat and regular potato rolls, both slider size. Since it was a casual dinner I didn't want to be in the kitchen the entire time everyone was here, so I was able to prepare everything ahead of time, all I needed to cook was the burgers. The Pulled Pork was easy because I was able to cook it in the crock pot the night before. I can't wait to try this in the summer!

Cheese Burger Sliders
Serves 12 (2 Burgers per person)

Ingredients

3lbs ground beef
4 tablespoons olive oil, plus extra to grease grill or grill pan
2 large shallots, grated
1 tablespoon dried basil
salt and pepper
6 slices cheddar, halved
6 slices swiss, halved
24 rolls

Directions

In a large bowl combine ground beef, olive oil, shallots, basil and salt and pepper.

Separate into 24 mini burgers.

Heat grill or grill pan to medium high heat. Coat with olive oil. Cook burgers about 5 minutes on each side then add cheeses, a half per burger.

Place each burger in a bun and serve!

Toppings

Kethup
Sautéed Mushrooms
Sautéed Onions
Tomatoes
Pickles
Lettuce
Mustard
Mayo
Mayo and Kethup (1/4 cup of each)
Salsa
Raw Onions

Pull Pork Sliders

Thursday, December 30, 2010

Ham and Cheese in Puff Pastry

As soon as I saw this on the Barefoot Contessa I could pretty much taste the cheesy goodness! I made this simple appetizer two times in the past two weeks, for a cocktail party and as an app for a dinner party. It is delish! I liked it because it had a lot of flavor without too many ingredients or preparation time. It was also great because I was able to prep it ahead of time them bake it right before my guests arrived. So yummy.


Ham and Cheese in Puff Pastry
Barefoot Contessa

Ingredients

1 package (2 sheets) frozen puff pastry, defrosted
2 tablespoons Dijon mustard
1/4 lb black forest ham, sliced
1/2 lb Swiss Cheese, sliced
1 egg, beaten with 1 tablespoon water, for egg wash

Directions

Preheat the oven to 450 degrees F. Place a piece of parchment paper on a sheet pan. (I ran out of parchment the second time I made it so I just used Butter Flavored cooking spray.)

Lay 1 sheet of puff pastry on a floured board and carefully roll it out to 10 by 12 inches. Place it on a sheet pan and brush the center with the mustard, leaving a 1-inch border around the edge. Place a layer first of ham and then cheese, also leaving a 1-inch border. Brush the border with the egg wash. Place the second sheet of puff pastry on the floured board and roll it out to 10 by 12 inches. Place the second on top of the filled pastry, lining up the edges. Cut the edges straight with a small, sharp knife and press together lightly. Brush the top with the egg wash and cut a few slits in the top to allow steam to escape.

Bake for 20- 25 minutes, until puffed and golden brown. Allow to cool for a few minutes and serve hot or warm.

Wednesday, December 29, 2010

Dream Bars

For another Sunday Funday I couldn't decide between cookies or some sort of dessert bar, so I found this recipe that was really both. They are called Dream Bars and they were to die for, especially right out of the oven. I actually was able to freeze them a few weeks before and let them defrost before baking and they were still really tasty.

I have been using Epicurious.com a lot lately and one of the best parts of the website is the comment section for each recipe. They always have so many helpful hints and suggestions from people that have tried them in the past. The comments for the Dream Bars were especially helpful. The recipe says to cook the brownie and cookie layers at the same time but the biggest overwhelming comment recommended to cook the brownie layer first then spread the cookie layer on top and bake. This worked really well. The recipe suggests to let cool completely but serving them warm with some good vanilla ice cream on top would be incredible.


Dream Bars
Gourmet
Makes 48 (2 by 1-inch bars)

Brownies
Ingredients:
  • 2 sticks (1 cup) unsalted butter
  • 8 ounces fine-quality bittersweet chocolate (not unsweetened), coarsely chopped
  • 1 1/4 cups all-purpose flour
  • 1 teaspoon baking powder
  • 1/2 teaspoon salt
  • 2 cups sugar
  • 4 large eggs
  • 2 teaspoons vanilla

Directions:

Melt butter and chocolate in a medium heatproof bowl set over a saucepan of simmering water, stirring occasionally, until smooth.


Whisk together flour, baking powder, and salt in a small bowl.


Whisk together sugar, eggs, and vanilla in a large bowl, then pour in chocolate mixture, whisking until combined well. Whisk in flour mixture, set aside.


Chocolate Chip Cookie Dough

Ingredients:

1 1/2 cups all-purpose flour

3/4 teaspoon baking soda

3/4 teaspoon salt

1 1/2 sticks (3/4 cup) unsalted butter, melted and cooled slightly

3/4 cup packed light brown sugar

1/2 cup granulated sugar

2 large eggs

3/4 teaspoon vanilla

1 1/4 cups semisweet chocolate chips (8 ounces)


Directions:

Put oven rack in middle position and preheat oven to 350°F. Grease a 13- by 9- by 2-inch baking pan and line bottom and sides with wax paper, then butter paper.


Spread brownie batter evenly in pan. Bake for 35 minutes while mixing cookie dough, remove from oven and let cool slightly.


Make chocolate chip dough:
Whisk together flour, baking soda, and salt in a small bowl.


Beat together butter and sugars in a large bowl with an electric mixer at high speed until pale and fluffy, 2 to 3 minutes. Lightly beat 1 egg with a fork in a small bowl and add 1 3/4 tablespoons of it plus remaining whole egg to butter mixture, beating with mixer until creamy. Beat in vanilla. Reduce speed to low and mix in flour mixture until just blended, then stir in chips.


Top brownies evenly with spoonfuls of cookie dough, spreading gently with back of spoon to form an even layer. If the brownies are not cooked the dough will sink into the batter, it also helps when spreading the cookie dough.


Bake until a wooden pick or skewer inserted in center comes out with moist crumbs adhering, about 35-45 minutes longer. Cool completely in pan on a rack, about 2 hours. Invert onto a cutting board, remove paper, and cut into bars.


Tuesday, December 28, 2010

Christmas Cookies

I have been very busy these past couple of weeks cooking, baking, and decorating all sorts of cookies. Holiday orders were keeping me very occupied up to the last second! Even though they took a lot of time they were still fun to make and came out pretty cute too. One of my orders wanted the cookies personalized, so I did names on each. I can't wait until next year to add more fun shapes to the Christmas assortment!!


Monday, December 27, 2010

Sunday Funday Pulled Pork

A few weeks ago my cousins came for Sunday Funday and I made Pulled Pork. I never made it before so I was a little nervous but it was so easy. I did use a recipe as a guide but changed and added things. The original suggested to use a pork shoulder but that made me a nervous too, so I used two pork tenderloins instead. I used a slow cooker cookbook from Williams-Sonoma as my guide. I also added some liquid smoke as an added flavor. It adds a little smokiness as if it was cooked in a smoker all day, a little goes a really long way. For the rolls I toasted them with a little butter and garlic powder, it made the bread soft on the inside and crispy on the outside, perfect with the pulled pork.


Sunday Funday Pulled Pork
Adapted from Williams-Sonoma Essentials of Slow Cooking
Serves 12 with leftovers

Ingredients
2 Boneless Pork Tenderloins (about 4 lbs)
salt and ground pepper
4 tablespoons canola oil
1 large yellow onion, chopped
3 cloves of garlic, chopped
1 cup chicken broth
4 cups (about 32 oz) of barbecue sauce, plus some for the serving
3 tablespoons of yellow mustard
1/2 cup honey
2 tsp of liquid smoke
Soft Round Rolls
Cole Slaw for topping, optional

Directions

Season pork all over with salt and pepper.

In a large frying pan over medium-high heat, warm the canola oil. Add the pork and cook, turning frequently, until browned on all sides, about 10 minutes. Brown each of the tenderloins separately to ensure all sides of each are browned. Remove from pan and set aside.

Pour out all but about 2 tablespoons of fat in the pan. Add the onion and saute over medium-high heat until softened, 3-5 minutes. Add the garlic and cook for 1 minute. Add the broth and season to taste with salt and pepper.

Transfer the pork to a slow cooker and add the broth mixture. Cover and cook until the pork is very tender, 8-10 hours (I cooked it over night) on a low-heat setting. Using 2 forks pull apart the pork into shreds. Add the barbecue sauce, the mustard, the honey, 1/2 teaspoon of salt, 1/4 teaspoon pepper and the liquid smoke. Stir well, set temperature to high, and cook, uncovered, stirring frequently, until the flavors are well blended and the sauce has thickened, about 30 minutes.

Serve the pork on the rolls, topped with the cole slaw. Serve additional BBQ sauce on the side.


Sunday, December 26, 2010

Duke Graduation Cookies

My friend Kristin ordered some cookies as a Secret Santa present for her cousin who just graduated from Duke nursing school. So I did a few Grad caps and the Duke D with a black background as well as a white background each with the the medical symbol.


Thursday, December 9, 2010

Peanut Butter and Chocolate Cheesecake Brownies

So honestly two of my favorite things are peanut butter and cheesecake. So when I came across this recipe I decided to make it immediately. What could be better than peanut butter and cheesecake together? Seriously? I made them for a dinner party at a friends' house, they were pretty tasty. My only change for next time would be not to cook them as long as suggested, my suggested time is below.

Peanut Butter and Chocolate Cheesecake Brownies
Bon Appetit
Makes 25

Ingredients

Brownie Layer:
Nonstick vegetable oil spray
8 ounces bittersweet chocolate, finely chopped
1/2 cup (1 stick) unsalted butter, diced
1/2 cup sugar
2 large eggs
1 teaspoon vanilla extract
1 /2 cup all purpose flour
1/4 teaspoon salt

Cheesecake Layer:
1 8-ounce package cream cheese, room temperature
1/3 cup creamy (smooth) peanut butter
1 teaspoon vanilla extract
1/2 cup sugar
2 large eggs
2 tablespoons heavy whipping cream
2 tablespoons all purpose flour
2 ounces bittersweet chocolate, chopped

Directions

For brownie layer:
Position rack in center of the oven and preheat to 325 degrees. Spray a 9-inch square metal baking pan with 2-inch-high sides with non-stick spray; line bottom with parchment paper.

Stir chocolate and butter in medium saucepan over low heat until smooth; cool 10 minutes. Using electric mixer, beat sugar, eggs, and vanilla in medium bowl until very fluffy, about 3 minutes. Beat in chocolate mixture on low speed, then beat in flour and salt. Spread batter in pan.

For Cheesecake Layer:
Using electric mixer, beat cream cheese, peanut butter, and vanilla in medium bowl until smooth. Gradually add sugar, beating until fluffy. Beat in eggs 1 at a time. Beat in cream, then flour. Transfer 1/3 cup cheesecake batter to small bowl and reserve. Spreading remaining cheesecake batter over brownie layer.

Place chocolate in small microwave-safe bowl. Microwave on low power in 10-second intervals until chocolate begins to melt, then stir until smooth. Mix chocolate into reserved 1/3 cup cheesecake batter. Drop chocolate batter by heaping teaspoonfuls atop cheesecake layer. Using chopstick or wooden skewer, swirl chocolate batter in figure-eight pattern through white cheesecake layer.

Bake brownies until edges of cheesecake layer are puffed and center is set, about 25 - 30 minutes. (Recipe suggests to cook for 36 minutes, which I thought was too long, so I suggest less time.) Cool brownies in pan on rack. Cover; chill at least 1 hour.

Cut brownies into 25 squares. Using narrow spatula, transfer brownies to platter. Serve cold.

Wednesday, December 8, 2010

Sausage - Cheddar Balls

I just subscribed to Martha Stewart's Everyday Food and they have some great, easy recipes. The first recipe I made was Sausage-Cheddar Balls. I've made these twice now and I tried them 2 different ways. I think they are delish! Below I've included the original recipe, but the 2nd time I tried the recipe I used Hot Italian Sausage and Three Cheese Cheddar. They were pretty spicy, so if you like "hot" this option would work for you. I love Buffalo Chicken so I think I am going to experiment next time with chicken sausage, blue cheese and Buffalo Sauce. I will definitely blog it when I do!

Sausage-Cheddar Balls
Everyday Food
Serves 4

Ingredients

1 1/4 cup all-purpose flour
1/2 teaspoon coarse salt
1/4 teaspoon ground pepper
1/2 teaspoon cayenne pepper
1 1/2 teaspoon baking powder
2 cups grated cheddar
1 lb bulk breakfast sausage
1/2 large yellow onion, grated on large holes of a box grater
3 tablespoons unsalted butter, melted

Directions

1. Preheat oven to 400 degrees. Line a baking sheet with parchment paper.

2. In a large bowl, whisk together flour, salt, ground pepper, cayenne pepper and baking powder. Add grated cheddar and toss to coat. Add sausage, grated onion and melted butter.

3. With your hands, mix until well blended and roll mixture into 1-inch balls. Place balls, 1/2 inch apart, on baking sheet. Bake until balls are golden and cooked through about 25 minutes. Serve warm.

Tuesday, December 7, 2010

Garlic and Brown Butter Mashed Potatoes

Honestly what is Thanksgiving without some homemade mashed potatoes? I changed the original recipe a little bit but it was still rich and creamy and delish. Denis really likes mashed potatoes with the skin on so I left half of them with the skins on. I also like how it looks, its kind of rustic. I will definitely be using this recipe again for next year! I didn't take a picture of them unfortunately but here is the recipe.

Garlic and Brown Butter Mashed Potatoes
Adapted from Gourmet
Serves 8-10

Ingredients

5 lbs Yukon Gold potatoes, half peeled, all cut into 1-inch pieces
1 tablespoon salt
1 cup whole milk
1/2 cup sour cream
1 1/2 sticks (3/4 cup) unsalted butter
4 gloves of garlic, grated on a microplane or minced
1/2 teaspoon black pepper

Directions

Cover with cold water by 2 inches in a 5 to 6 quart heavy pot and add 1 1/2 teaspoons salt. Bring to a boil, then reduce heat and simmer, uncovered, until potatoes are tender, 10 to 15 minutes.

Drain potatoes in a colander, then return to pot and cook over moderate heat, shaking pot occasionally, until dry, 1 to 2 minutes. Mash hot potatoes with masher then cover to keep warm.

Bring milk with remaining 1 1/2 teaspoons salt just to a boil in a 1-quart saucepan, then remove from heat and stir into potatoes until combined. Stir in sour cream, then cover and keep warm.

Cook butter in a 12-inch heavy skillet over moderately high heat, stirring frequently and scraping up brown bits, until foam subsides and butter is golden brown, about 8 minutes. Add garlic and pepper and cook, stirring, until slightly softened, about 2 minutes. Fold butter mixture into mashed potatoes and season with salt.


Saturday, December 4, 2010

Cat Cora's Southern Cornbread

I love cornbread, so I really wanted to try it for Thanksgiving. I've never made it before so I thought this recipe was a good one to try. I heard Cat Cora talk about it in a Thanksgiving episode then the recipe was in my Food Network Magazine. It smelled so yummy and tasted pretty good too with some butter.

Cat Cora's Southern Cornbread
Cat Cora's Classics
Serves 4 to 6 people

5 tablespoons unsalted butter, plus more for the pan
3/4 cup all-purpose flour
3/4 cup cornmeal
1 1/2 teaspoon baking powder
1/2 teaspoon kosher salt
1 cup buttermilk (shake before measuring)
2 large eggs

Directions

1. Preheat oven to 425 degrees and position a rack in the middle. Butter an 8-inch-square baking pan.

2. Melt the butter in the microwave in a microwave-safe dish in three 15-second intervals on high or in a small pan on the stove. Set it aside to cool.

3. In a bowl, whisk together the flour, cornmeal, baking soda and salt.

4. In a large bowl, whisk together the buttermilk and the eggs. Add the melted butter. Add the flour-cornmeal mixture and stir just until combined. Pour the batter into the pan. Bake until the cornbread just begins to brown and a toothpick inserted in the center comes out clean, 18 to 23 minutes. Cool for about 10 minutes before serving.

Streuseled Sweet Potato Casserole

This is probably the only semi-low calorie recipe I made on Thanksgiving. I found the recipe on Cooking Light, my go to website. Sometimes you can tell when I make something that is low calorie but this recipe was killer! It was so good and I will definitely be making it next year. It was like having desert for dinner. I liked it so much I had it for breakfast the next morning, only on Thanksgiving. I highly recommend it, but I wouldn't really eat it if you were trying to watch the calories!

Streuseled Sweet Potato Casserole
Cooking Light
Yield: 18 servings

Ingredients

14 cups (1-inch) cubed peeled sweet potato (about 5 pounds)
1/2 cup half-and-half
1/2 cup maple syrup
1 teaspoon vanilla extract
3/4 teaspoon salt
1 large egg, lightly beaten
Cooking spray
1/2 cup all-purpose flour
1/2 cup packed brown sugar
1/4 cup chilled butter, cut into small pieces
1/2 cup chopped pecans

Directions

Preheat oven to 375 degrees

Place potatoes in a Dutch oven, and cover with water. Bring to a boil. Reduce heat; simmer 12 minutes or until tender. Drain.

Combine the half-and-half and next 4 ingredients ( half-and-half through egg) in a large bowl, stirring with a whisk. Add potato to egg mixture; beat with a mixer at medium speed until smooth. Spoon potato mixture into a 13 x 9-inch baking dish coated with cooking spray.

Combine flour and sugar in a food processor; pulse to combine. Add chilled butter; pulse until mixture resembles coarse meal. Stir in pecans; sprinkle over potato mixture.

Cover and bake at 375 degrees for 15 minutes. Uncover and bake an additional 25 minutes or until the topping is browned and the potatoes are thoroughly heated.

Friday, December 3, 2010

Thanksgiving Menu

Thanksgiving is one of our favorite holidays. Definitely Denis's! So we had a ton of food planned. Some food definitely came out better than others though, note to self for next year. Our Turkey was delish after being in a brine for over 12 hours, it was very juicy and moist. My pumpkin pie on the other hand needs some work; crust was good, pie not so much, next year I am going to stick with a traditional pie recipe instead of being fancy. I also tried dinner rolls they weren't very successful either, but I plan on trying them again shortly. Everything else came out pretty tasty. Since we only have one oven I was able to prep a lot the day before and everyone brought something from home as well. It was all very yummy. We made the Turkey, Sweet Potato Casserole, Mashed Potatoes, Cornbread, and Butternut Squash soup. Below is the menu, recipes will follow later:


The Menu

Appetizer

Butternut Squash Soup with Crispy Bacon
Crab Dip
Caramelized Onion and Brie Puff Pastry
Pepperoni Bread

Dinner

Turkey Brined and then Cooked with Garlic and Herb Butter
Sweet Potato Casserole
Garlic and Brown Butter Mashed Potatoes
String Bean Casserole
Broccoli Casserole
Corn Bread
Parsnips
Creamed Spinach
Stuffing

Desert

Pumpkin Pie
Brownies al a mode
Cherry Cake Bars


Thursday, December 2, 2010

Thanksgiving

As I mentioned before we hosted Thanksgiving again this year, for the 2nd year in a row. We had 12 people in our tiny apartment (next year we will definitely be in a house)! It was my parents, my sister and her boyfriend, my brother, my In-Laws and my sister-in-law, and my sister's boyfriend's Mom and Sister. It was very cozy. I decorated the tables with twig-like pumpkins for the centerpieces with tiny orange tea lights surrounding them. I went with fall colors for the napkins and tablecloths. We set up each of the cookies on the bread plates, for each person. I used our close to brand new china and crystal too. Below are some pics from the tablescape. The Menu and recipes will follow shortly.

Adult table...
Kids' Table...
Cookie Placecards..


Wednesday, December 1, 2010

Thanksgiving Cookies

We hosted Thanksgiving again this year, more to follow on that later, so I made cookies but used them as place cards. We had 12 people so I did 6 turkeys and 6 pumpkins. I thought they came out pretty cute!
Pre-baggies and ribbons..
Turkeys...
Pumpkins...
with Brown Bows!

Saturday, November 20, 2010

Butternut Squash Soup with Mini Ham and Cheese Sandwiches


I know in one of my past entries I mentioned that pumpkin was one of my favorite fall ingredients, but butternut squash is definitely in the running as well! Every time I'm at a restaurant or an event that serves butternut squash soup I always order it. It tastes so good when the weather gets cold and crisp. I think the reason I haven't attempted to make the soup myself was because I thought it was complicated but this recipe was so easy. Butternut squash is tough to cut but the supermarket sells pre-peeled and pre-cut packages, so that makes it easier too. I plan on making this soup again soon! The original recipe calls for slices of French bread with Swiss cheese, but I thought warm mini ham and cheese sandwiches would be a nice addition.

Butternut Squash Soup with Side Salad and Mini Ham and Cheese Sandwiches
Adapted from Cooking Light
Serves 4
Ingredients

Soup:
1 tablespoon butter
3 1/2 cups cubed peeled butternut squash (about 1 1/2 lbs)
3/4 cup chopped carrot
1/2 cup chopped sweet onion
2 1/2 cups fat free, less-sodium chicken broth
1/4 cup half-and-half
1/8 teaspoon salt

Ham and Cheese Sandwiches:
16 Slices French Baguettes (about 1/4 inch thick)
8 slices of ham
8 slices of swiss cheese
Dijon mustard
2 tablespoon butter

Directions

1. To prepare soup, melt butter in a large saucepan over medium-high heat. Add squash, carrots, and onion; saute for 12 minutes. Add chicken broth, and bring to a boil. Cover, reduce heat, and simmer for 30 minutes. Remove from heat; stir in half-and-half and salt.

2. Preheat broiler.

3. Place squash mixture in a blender. Remove center piece of lid (to allow steam to escape), and secure blender lid on blender. Place clean towel over opening in blender (to avoid splatters). Blend until smooth. NOTE: I used a hand held blender instead, to prevent extra clean up.

4. To prepare toasts, spread butter evenly on each slice then arrange 8 pieces, butter side down, on a baking sheet. Spread dijon mustard on each piece of bread. Then layer half a slice of cheese, a piece of ham, then the other half slice of cheese. Close with the 8 remaining French bread slices, butter side up. Broil for 5 minutes, then flip sandwiches for 5 more minutes or until toasted. Make sure you keep an eye on the sandwiches, they will cook quickly. Yields 2 sandwiches per person and about 1 cup of soup.

For side salad:
Combine 2 tablespoons fresh lemon juice, 1 tablespoon extra-virgin olive oil, 1 tablespoon sugar, 1/4 teaspoon salt, and 1/4 teaspoon black pepper in a large bowl; stir with a whisk. Add 6 cups fresh spinach and 1/2 cup sliced red onion, and toss to coat.

Wednesday, November 17, 2010

Happy Birthday RJ and Emmy!

Last week I made my biggest cookie order yet! It was for a first birthday party for twins. The theme was Rubber Duckies and Blue/Yellow and Pink/Lime. This is the finished product.

Happy Birthday RJ and Emmy!!

Rubber Duckies..

Ones!

Friday, November 5, 2010

Her Royal Cuteness - Abbie's 1st Birthday!!

Our friends Colleen and Chuck's little girl is turning 1 years old today. She is the cutest! So Abbie's Grandma (Mrs. Heyert) requested some favors for the special event. The color scheme was pink and lavender, naturally!!! She really is the royal cuteness!!!
One's...
Her Royal Cuteness...
Love Always, The Cookie Closet!!

Tuesday, October 26, 2010

Philly Cheese Steak Casserole

On Monday nights I have swimming practice until 8 p.m., when I get home the last thing I want to do is cook dinner. So lately I've been trying to make casseroles before practice, so all I need to do is pop it in the oven when I get home. This one was so yummy and really easy. The original recipe actually calls for sirloin steak but I decided to use ground beef instead and I was glad I did. This dish was really cheesy, creamy and low calorie, the best of everything! I definitely recommend it.


Philly Cheese Steak Casserole
Adapted from EatBetterAmerica.com
Serves 6

Ingredients

6 ounces uncooked egg noodles
1 lb lean ground beef
1/4 teaspoon pepper
1 cup onions, chopped
1/2 cup green peppers, chopped
1 3/4 cups Progresso beef broth
1/4 cup flour
1/2 cup fat-free half-and-half
1 tablespoon Dijon mustard
3/4 cup shredded reduced fat Cheddar cheese

Directions

1. Heat oven to 350 degrees. Spray a 2-quart glass baking dish with cooking spray. Cook and drain noodles as directed on package.

2. Meanwhile heat a 12-inch nonstick skillet over medium heat. Cook beef and season with pepper, about 2-3 minutes stirring occasionally until beef is brown. Stir in onions and bell pepper. Cook 2 minutes, stirring occasionally. Spoon into baking dish.

3. In a medium bowl beat broth and flour with a whisk until smooth. Add to skillet heat to boiling. Cook, stirring constantly until mixture thickens, remove from heat. Stir in half-and-half and mustard. Spoon over beef mixture. Stir in cooked noodles.

4. Cover and bake 40 minutes. Sprinkle with cheese. Bake uncovered about 10 more minutes longer or until cheese is melted and casserole is bubbly.


Sunday, October 24, 2010

A few of my favorite things....Halloween

Halloween is just around the corner so I have a found a few things to spruce up your table for the holiday!

Halloween Centerpiece

Martha Stewart always does it right. I found this pic on her website, it was naturally one of many! You can buy synthetic pumpkins and black paint and silver glitter and make these yourself. A local craft store will have black candles , the fake spiders, and cobwebs.

Pottery Barn

This cauldron is great for a dinner party or a kids' party. If you place another bowl underneath it you can put dry ice in it for a really great effect!


Williams Sonoma

These are great for the kids to decorate for a Halloween party.


Worldmarket.com

This would look awesome if you are doing a black/silver color scheme for your party. Or if you have an orange tablecloth to place underneath.


Skull and Crossbones Flocked Placemat and Orange Napkins
Kohl's

I really like this skull and crossbones placemat. It matches really well with the below napkins.
Napkins come in Orange and Black, you could alternate between black and orange by placesetting.
Texashillcountrycermics.com

I love napkin rings and I am always looking for new ones, these skulls are great for your Halloween party.


Tuesday, October 19, 2010

Pumpkin Cheesecake Bars

Fall is finally here! Which means I can start cooking with pumpkin again. I know you can use it any time of year but it is just so fall to me. Pumpkin is definitely my favorite fall ingredient. My friend Nicole made a pumpkin cheesecake last year and I have been hooked since. So since the temperature just started to drop last week, I decided it was time to make something with pumpkin. I found these cheesecake bars in Cooking Light and they sounded yummy! I did need to cook it longer than the recipe suggested, but this recipe was still very easy.

Pumpkin Cheesecake Bars
Cooking Light
Yields 12 Servings

Ingredients

Crust:
1 1/2 cups all-purpose flour (6 3/4 ounces)
1/2 cup packed brown sugar
1/8 teaspoon salt
8 teaspoons chilled butter, cut into small pieces
Cooking spray

Filling:
1 1/4 cups canned unsweetened pumpkin
1/2 cup granulated sugar
1/2 cup packed dark brown sugar
1 (8-ounce) package fat-free cream cheese, softened
1 (8-ounce) package 1/3-less-fat cream cheese, softened
3/4 cup egg substitute
1 teaspoon ground cinnamon
1 1/2 teaspoons vanilla extract
1/4 teaspoon ground allspice
1 large egg

Remaining Ingredients:
1/4 cup chopped pecans
2 teaspoons water
Directions

Preheat oven to 350 degrees.

To prepare crust, lightly spoon flour into dry measuring cups; level with a knife. Heat a nonstick skillet over medium-high heat. Add flour to pan; cook 5 minutes or until light brown, stirring often. Remove pan from heat. Transfer flour to a bowl; cool completely.

Combine cooled flour, 1/2 cup brown sugar, and salt in a food processor; pulse 5 times or until combined. Add chilled butter; pulse until mixture resembles fine meal. Press 1 cup of flour mixture evenly into the bottom of a 13 x 9 inch baking dish coated with cooking spray; reserve the remaining flour mixture. Bake at 350 degrees for 10 minutes or until crust is lightly browned.

To prepare filling, spread pumpkin in an even layer on several paper towels; cover with additional paper towels. Let stand 5 minutes.

Combine granulated sugar, 1/2 cup dark brown sugar, and cream cheeses in a bowl. Beat with an electric mixer at medium speed 2 minutes or until smooth. Scrape pumpkin into bowl using a rubber spatula. Add egg substitute, cinnamon, vanilla, allspice, and egg; beat until smooth.

Scrape batter into baked crust.

Combine reserved flour mixture and pecans in a small bowl; sprinkle with 2 teaspoons water. Squeeze handfuls of topping to form large pieces. Crumble over filling. Bake at 350 degrees for 55 minutes or until filling is firmly set. Remove from heat; cool in pan on wire rack to room temperature. Cut into 12 portions. Serve at room temperature.

NOTE: The original recipe suggests to cook for 40 minutes but I didn't think that was long enough so I cooked it for 15 more minutes and it was good to go!


Sunday, October 17, 2010

Christy's 30th Birthday Cookies

My friend Christy turned 30 on Friday and I helped plan the big party and naturally I made cookies as party favors. The party was a success and everyone had a great time! Happy birthday Spuds!!!

Tuesday, October 12, 2010

Wedding Favor Cookie Tasting

A friend is getting married in a few weeks and she was thinking about using my cookies as a favor for her wedding. This was the first time I had done anything like this so I wanted to make it special. Her colors are purples but she has since added orange to accent the purple, great fall color scheme! So I did her cookies with a deep purple to match her invites and set up a display to match her wedding colors. I made a variety of cookies in purple and white, with initials, their names, wedding date, and cakes with roses with alternating colors.

Champagne and Invitation

Purple and White cookies.

Hearts and Circles.
Cakes with roses and initials


Friday, October 8, 2010

Cherry Tomatoes Red Clam Sauce with Linguine with Grilled Romaine Caesar Salad

The beginning of the summer Denis and I got a puppy named Cooper. He's honestly the cutest! So a few weeks ago our friends The Beeney's (Matt, Nicole and their cute little Pit,Maya) came over for dinner and we had a puppy playdate! This was the first time they met and it was super cute. I served Cherry Tomatoes Red Clam Sauce with Linguine and Grilled Caesar Salad. It was pretty yummy. I didn't really change anything but the clams, I used little necks instead of the Manila. The biggest difference is the size, littlenecks are slightly smaller than Manila clams. And don't be afraid of the anchovy ingredient it just adds a little something extra to the flavor and the anchovy taste is not strong in this recipe.


Since we had our dinner party/playdate at the end of the summer I used sunflowers to decorate the table with a yellow and blue color scheme. I love tablescaping!


Cherry Tomatoes Red Clam Sauce with Linguine
Rachael Ray
Serves 6
Ingredients
Salt
1 pound linguine
3 tablespoons extra virgin olive oil
5-6 anchovies
1 pint small cherry tomatoes
1 red onion, finely chopped
4 cloves of garlic, chopped
1/2 teaspoon crushed red pepper flakes
2 stems oregano, leaves stripped and finely chopped
a handful flat leaf parsley, finely chopped
black pepper
1 cup dry white wine
3 tablespoons butter, cut into small pieces
3 pounds Manila clams, scrubbed
1/2 cup basil leaves, torn

Preparation

Bring water to a boil for the pasta; salt the water and cook the pasta just shy of al dente

While the water comes to a boil, heat olive oil over medium to medium-high heat. Add the anchovies and melt into the olive oil. And the tomatoes, onion and garlic to the pan and season with crushed red pepper flakes, oregano, parsley and pepper. Saute until the tomatoes and onions are soft, 8-10 minutes.

Add the wine and reduce for 1-2 minutes, then melt the butter into the sauce and add the clams to pot. Cover the pot and cook the clams until they open, 6-7 minutes.

Remove any unopened clams and add the pasta to the pan. Toss the linguine with the sauce for about 2-3 minutes so the pasta absorbs the flavors. Add the basil to the pasta and taste to adjust the seasonings.

Grilled Romaine Caesar Salad
Adapted from Cooking Light 15 Minute Recipes
Serves 4


Ingredients

1/4 teaspoon salt
1/2 teaspoon pepper
2 romaine hearts, cut in half lengthwise
Olive oil-flavored cooking spray
4 (1-ounce) slices French bread baguette (1 inch thick)
Caesar Dressing (recipe follows)

1. Prepare grill

2. Coat romaine hearts with cooking spray, and sprinkle with salt and pepper. Coat both sides of bread slices generously with cooking spray.

3. Place romaine and bread on a grill rack coated with cooking spray. Grill romaine halves 4 to 5 minutes. Grill bread slices 3 minutes on each side or until toasted.

4. Arrange grilled crouton evenly over romaine halves; drizzle evenly with caesar dressing.

Caesar Dressing

1/2 cup nonfat buttermilk
1/4 cup (1 ounce) grated fresh Parmigiano-Reggiano cheese
2 tablespoons light mayonnaise
1/2 teaspoon freshly ground black pepper
1/2 teaspoon Dijon mustard
2 garlic cloves, pressed

Combine all ingredients in a bowl, stirring with a whisk until smooth. Yields 3/4 cups.

NOTE: I used a hand held blender to make it really smooth and blended.